Particles page
Learn how to use the Particles page in Vertikal, which adjusts the behavior of the Particles engine generating a cloud of additional notes.
The Particles page lets you adjust the behavior of the Particles engine, which generates a cloud of additional ghost notes.
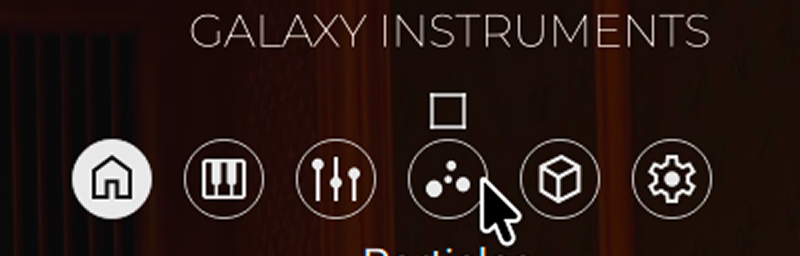
Click Particles at the top right of the instrument to open the Particles page.
The central Particles section contains the following elements and controls:
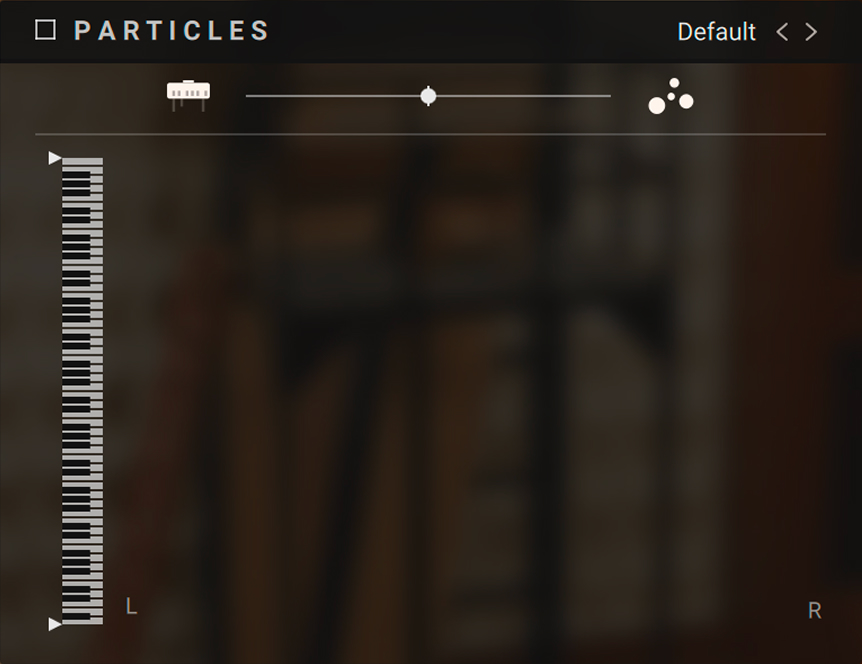 |
Particles On/Off switch: Turns the Particles engine on or off. This switch mirrors the on/off switch that appears when hovering the Particles icon in the main navigation at the top.
Particles Preset selector: Shows the name of the loaded preset for the Particles engine. Clicking the preset name opens the Preset Browser where you can select another Particles preset. You can also click the little left/right arrow next to the preset name to quickly load the previous or next preset from the browser’s result list without opening the browser. You can find more information in Particles Browser.
Piano/Particles Blend fader: Adjusts the blend between the main piano sound on the left, and the particles on the right.
Piano Roll: Shows the keys your are playing and lets you set the keyboard range for the Particles engine by dragging the two arrows up or down. Keys outside of this range will not trigger any particles.
Visual Display: Shows an real-time animation of the particles as they are generated. As you play and hold keys on your keyboard, the additional notes generated by the Particles engine appear as colored circles whose position indicates their pitch (vertical axis) and stereo panning (horizontal axis), while their color indicates from which source sample(s) they are originating.
The parameters of the Particles engine are organized in the Algorithm section on the left side, the Motion section at the bottom, and the Sources and Effects sections on the right side:
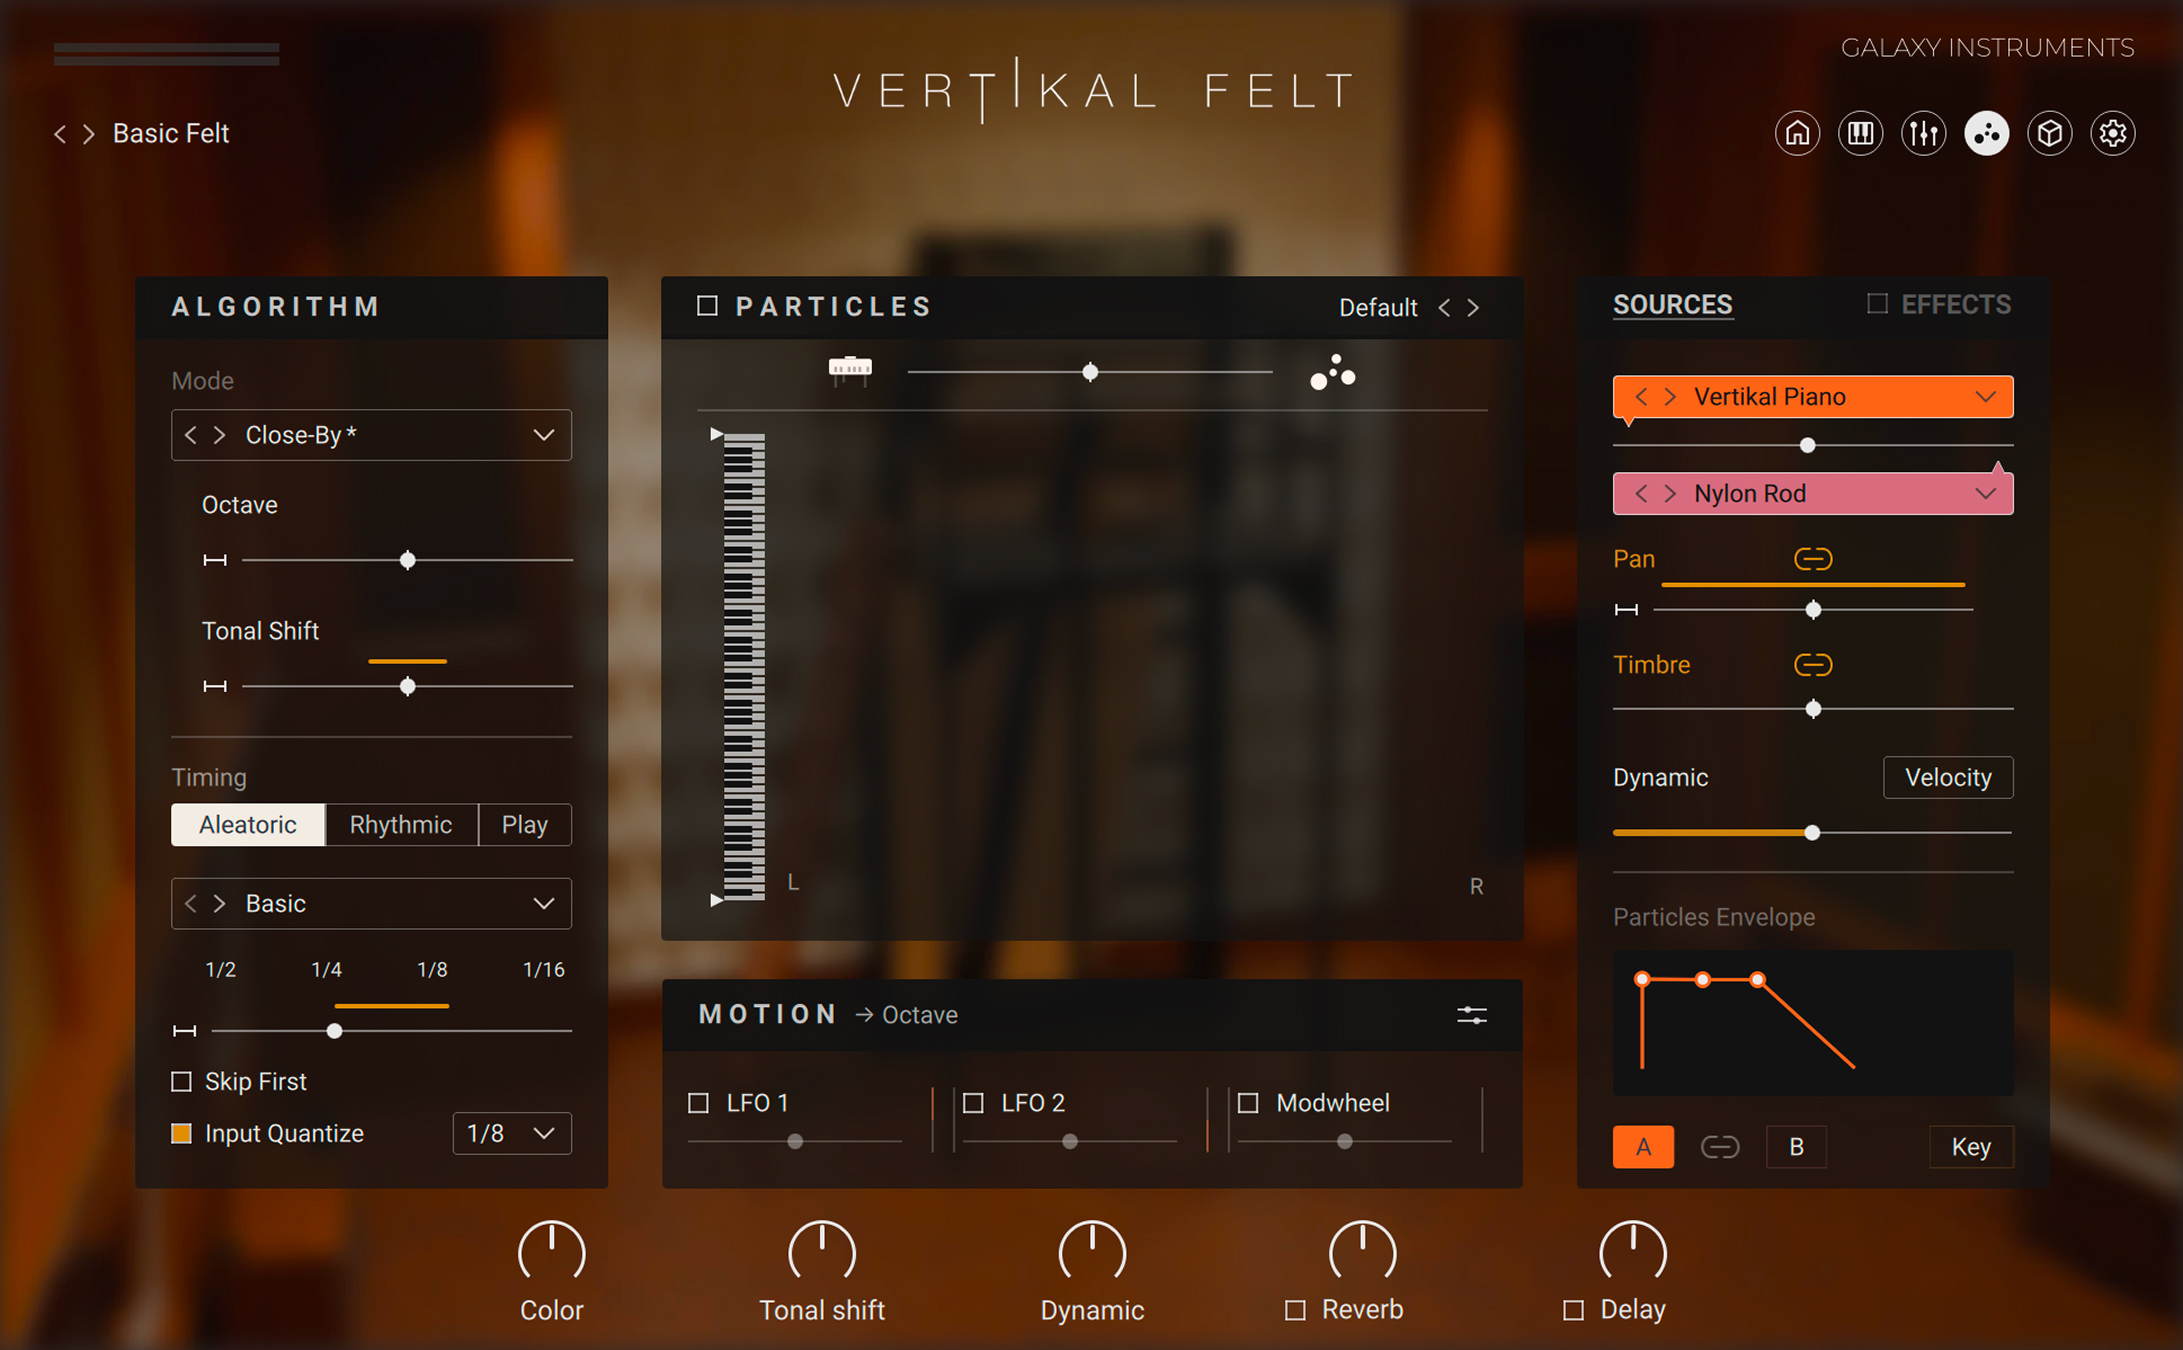
Algorithm section: Adjusts the algorithm used to generate the particles. This will affect the timings and pitches at which the particles will be triggered. You can find more information in Algorithm section.
Motion section: Lets you configure and assign modulation to the parameters on the Particles page. You can find more information in Motion section.
Sources section: Selects and adjusts the two base samples triggered by the Particles engine. You can find more information in Sources section.
Effects section: Configures the effects processing the particles. You can find more information in Effects section.
Particles Browser
The Particles Browser lets you find and load Particles presets from the Vertikal factory library.
To open the Particles Browser, click the name of the current Particles preset in the top left corner of the Particles page:

The Particles Browser follows this typical workflow:
In the left part of the Browser, you can click the properties describing the type of particles that you are looking for.
In the right part of the Browser, the list shows the presets matching the properties that you have selected.
The Particles Browser provides the following controls:
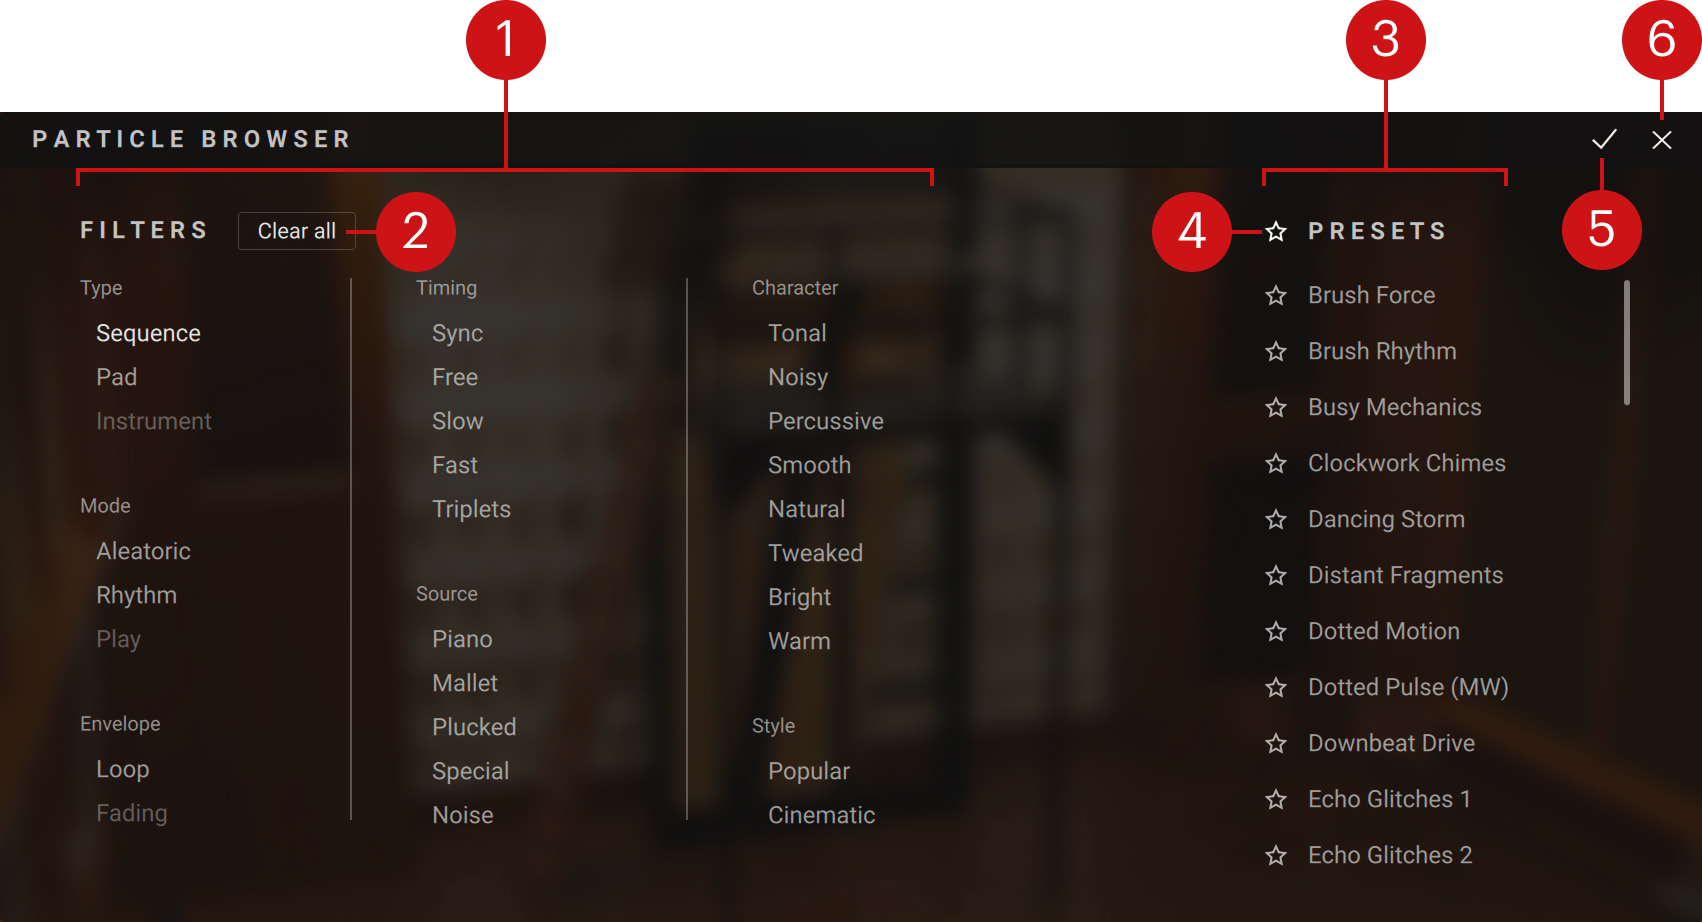
Tag filter: You can click the tags describing the particles that you are looking for. The Presets list on the right is updated accordingly. The Tag filter is organized into three columns, from left to right: Types, Recordings, and Characters & Styles. As you select tags, the color intensity of the remaining tags indicates whether or not some presets are available:
Highlighted tags are already selected. You can click them to deselect them and widen the scope of your search.
Normal tags are not selected but they have matching presets in the current Presets list. You can select them to further narrow your search.
Faded tags are not selected and they do not have any matching presets in the current Presets list. You cannot select them, unless you deselect other tags first.
Clear all: Removes all filter tags from your selection.
Presets: Shows the presets matching the tags selected in the Tag filter on the left. You can click a preset to load it and try it directly on your keyboard or in your DAW. You can double-click a preset to load it and close the Browser.
Favorites: You can click the star icons to add or remove presets to/from your Favorites. The star icons are lit for the presets set as Favorites. This way, you can quickly create a custom collection of your most beloved presets. You can then display only your Favorites by clicking the topmost star icon next to the Presets header. Click the topmost star icon again to display also non-Favorite presets.
OK (check mark): Keeps the selected preset loaded and closes the Particles Browser. This is the same as double-clicking the preset in the Presets list.
Cancel (cross): Closes the Particles Browser without changing anything. Your instrument returns to its previous state.
Algorithm section
The Algorithm section of the Particles page lets you fine-tune the moments and pitches at which the particles will be triggered:
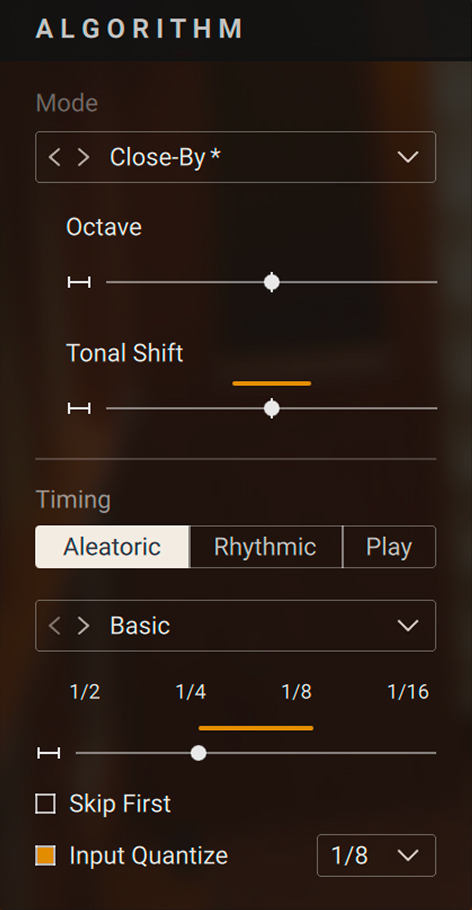 |
The section contains the following controls, from top to bottom:
Mode: Selects from different presets for the Octave and Tonal Shift ranges. You can click the preset name to open a drop-down menu and select a preset, or click the arrow icons next to it to quickly load the previous or next preset from the list.
Octave range: Shifts the octave range in which the particles are generated. You can adjust the range by clicking the range icon to the left of the slider and dragging up or down.
Tonal Shift range: Shifts the range of tonal shift applied to the particles. Tonal Shift changes the playback speed of each sample, resulting in formant or character changes. You can adjust the range by clicking the range icon to the left of the slider and dragging up or down.
Timing: Switches between three different modes that determine the timing and rhythm at which the particles are generated.
Aleatoric: Produces particles at random timing intervals according to the range set using the Aleatoric range slider.
Rhythmic: Produces particles in rhythmic patterns that can be programmed using a step sequencer.
Play: Lets you play the Particles sources directly from the keyboard, opening up new possibilities for expressive performance and sound design.
Skip First (only in Aleatoric and Rhythm mode): Introduces a delay between your original note and the generated particles. When switched off, the particle cloud starts instantly when you press a key.
Input Quantize: Quantizes the MIDI note input to the beat according to the note division set in the Quantize menu.
Quantize menu: Sets the quantization value used when Input Quantize is on.
Aleatoric mode
Aleatoric mode produces particles at random timing intervals according to the range set using the Aleatoric range slider.
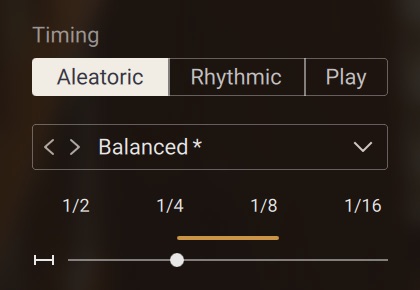 |
Aleatoric mode: Selects from different presets for the Aleatoric range, including synchronized modes. You can click the preset name to open a drop-down menu and select a preset, or click the arrow icons next to it to quickly load the previous or next preset from the list.
Aleatoric range: Shifts the timing range in which consecutive particles are generated. You can adjust the range by clicking the range icon to the left of the slider and dragging up or down. If a synchronized timing mode is selected, you can set four different beat divisions to switch between by clicking the note values above the slider.
Rhythmic mode
Rhythmic mode produces particles in rhythmic patterns that can be programmed using a step sequencer. By adding random variations of the steps' velocity and rhythmic position you can create patterns that evolve over time.
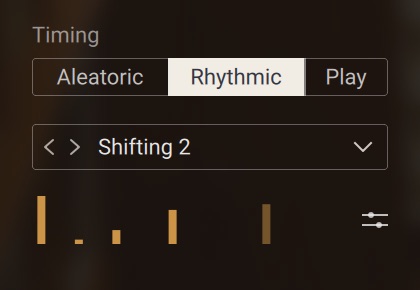 |
Rhythmic mode: Selects from different presets for the Rythmic patterns. You can click the preset name to open a drop-down menu and select a preset, or click the arrow icons next to it to quickly load the previous or next preset from the list.
Pattern display: Shows the current pattern and lets you open the Rhythmic settings by clicking on the pattern.
Rhythmic settings: Opens the Rhythmic settings that let you edit the pattern in detail.
The Rhythmic settings contain the following options and controls:
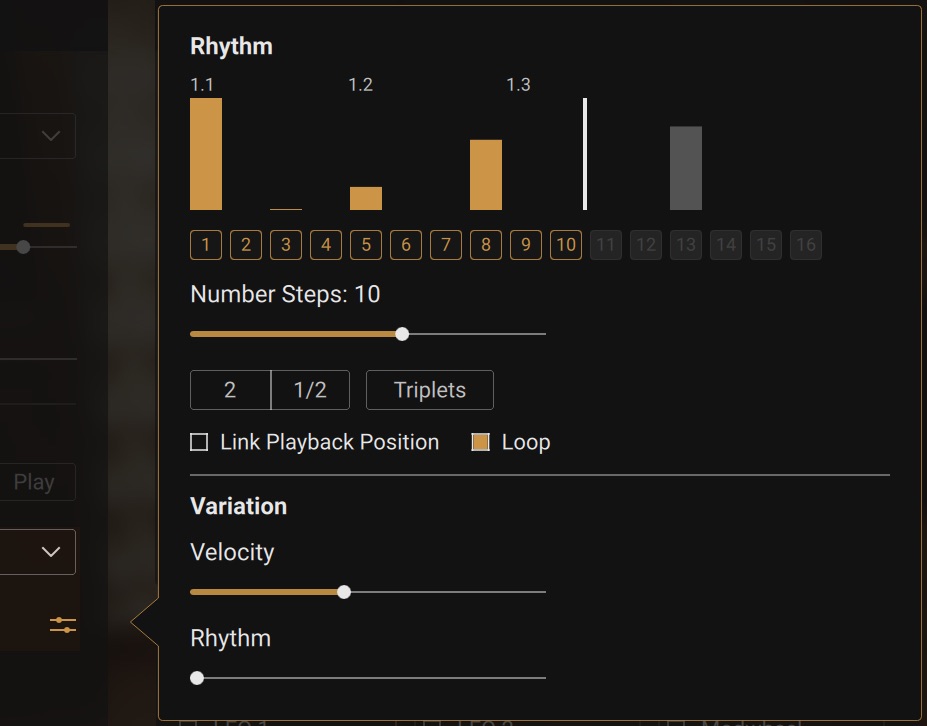 |
Step sequencer: Lets you program the pattern according to which the Particles are generated. Clicking and dragging a step up or down sets the velocity. You can switch steps on or off using the numbered buttons, creating pauses in the pattern.
Number Steps: Sets the number of steps in the step sequencer and therefore the length of the pattern.
2: Doubles the step sequencer's tempo.
1/2: Halves the step sequencer's tempo.
Triplets: Sets the step sequencer playback to triplets.
Link Playback Position: Links the playback positions when multiple patterns are playing at the same time. Patterns triggered by playing more than one note will start at the current playback position of already playing patterns. Therefore, patterns stay in sync, creating a rhythmic chord sequence.
Loop: Loops the step sequencer playback. When off, the pattern plays once for every key press.
Velocity Variation: Randomizes the velocity values for each step.
Rhythm Variation: Randomizes the rhythmic position for each step.
Motion section
The Motion section on the Particles page lets you configure modulation sources and assign them to the parameters of the Particles engine:
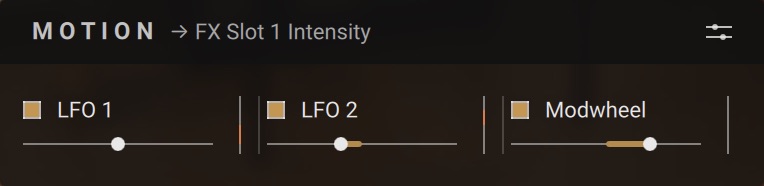 |
The section contains the following controls, from top to bottom:
Parameter name: Shows the parameter currently selected for modulation assignment. You can select parameters by clicking on their control elements in the user interface.
Motion settings: Opens the settings for the modulation sources. You can switch between the settings pages for each source by selecting LFO 1, LFO 2, or Modwheel/Aftertouch/Velocity (MIDI In) in the Motion section.
LFO 1 On/Off: Switches the modulation from LFO 1 to the selected paramter on or off. LFOs, or low-frequency oscillators, produce cycling modulation according to their waveform and rate.
LFO 1 Amount: Adjusts the strength of modulation assigned from LFO 1 to the selected parameter (shown in the Motion header). At center position, no modulation is applied. Moving the slider to the right applies positive (non-inverted) modulation. Moving it to the left applies negative (inverted) modulation.
LFO 2 On/Off: Switches the modulation from LFO 2 to the selected paramter on or off. LFOs, or low-frequency oscillators, produce cycling modulation according to their waveform and rate.
LFO 2 Amount: Adjusts the strength of modulation assigned from LFO 2 to the selected parameter (shown in the Motion header). Moving the slider to the right applies positive (non-inverted) modulation. Moving it to the left applies negative (inverted) modulation.
Midi Mod On/Off: Switches the modulation from the Midi Mod source to the selected paramter on or off.
Midi Mod Amount: Adjusts the strength of modulation assigned from the MIDI Mod source to the selected parameter (shown in the Motion header). Moving the slider to the right applies positive (non-inverted) modulation. Moving it to the left applies negative (inverted) modulation.
LFO Settings
The settings for LFO 1 and LFO 2 contain the following options and controls:
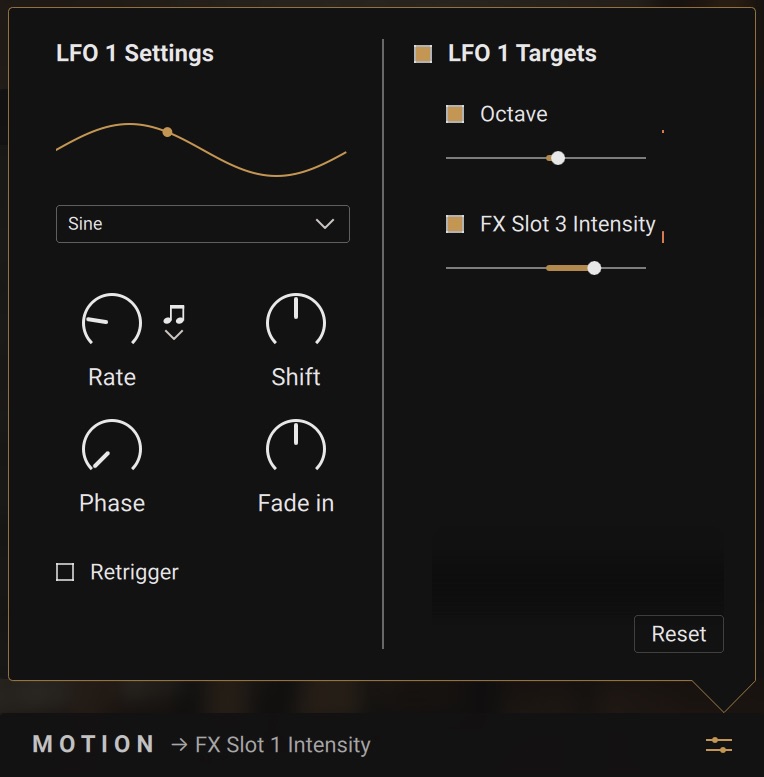 |
Waveform: Selects the LFO waveform and therefore the shape of the cycling modulation. You can choose from basic waveforms as well as both stepped and smooth random modulation.
Rate: Adjusts the frequency of the LFO and therefore the speed of the cycling modulation.
Sync: Synchronizes the LFO to the tempo of your DAW and lets you set Rate in straight, dotted, or triplet time divisions.
Phase: Adjusts the phase position of the LFO cycle when retriggered.
Retrigger: Resets the LFO cycle at the beginning of each MIDI note, according to the position set using the Phase control.
Shift: Skews the LFO waveform and therefore the shape and rhythm of the cycling modulation.
Fade in: Adjusts the time it takes the LFO to fade in once a MIDI note is received.
LFO 1/2 Targets: Lets you view and edit all modulation assignments for the selected modulation source. You can mute the modulation using the On/Off button, adjust the modulation amount, and delete the assignment by hovering the entry and clicking on the X icon.
Reset: Removes all modulation assignments for the selected modulation source.
MIDI Mod Settings
The settings for the MIDI Mod source contain the following options and controls:
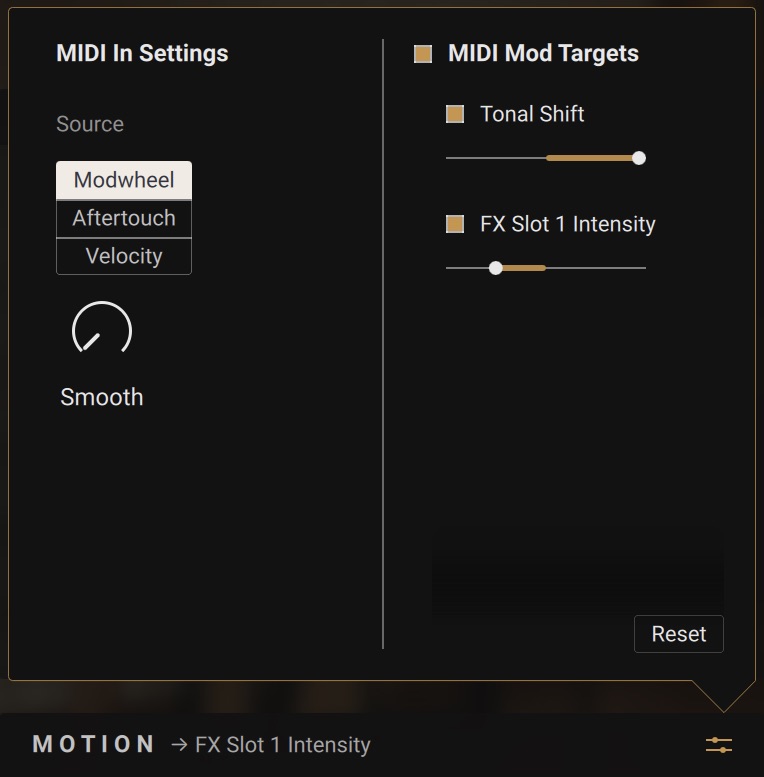 |
Source: Selects either the Modwheel, Aftertouch, or Velocity as the MIDI Mod source.
Smooth: Adjusts the smoothing applied to the MIDI Mod source. Short times create an immediate response with sharp transitions, whereas long times create a laid-back response with smooth transitions.
MIDI Mod Targets: Lets you view and edit all modulation assignments for the selected modulation source. You can mute the modulation using the On/Off button, adjust the modulation amount, and delete the assignment by hovering the entry and clicking on the X icon.
Reset: Removes all modulation assignments for the selected modulation source.
Sources section
The Particles engine can blend two different samples as sources to generate the particles. The sources include the original piano sounds and alternative playing techniques, such as plucked or brushed strings. You can not only adjust the dynamic range of the particles generated from the sources, but also their panning and timbre, both at the same time or individually per source. By modulating the controls in the Sources section you can create evolving stereo textures and continuously changing sound colors.
You can set up the two sources in the Sources section of the Particles page:
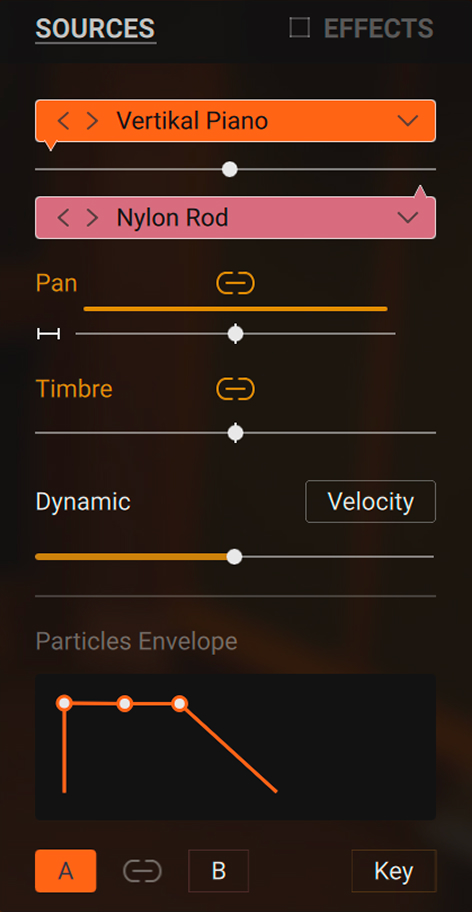 |
The section contains the following controls, from top to bottom:
Source A selector: Displays the name of the sample used as source A. Clicking the name opens the Source browser that lets you choose another sample. Alternatively, you can click the arrow icons to load the previous or next sample in the list.
Source Mix slider: Adjusts the mix between source A and source B.
Source B selector: Displays the name of the sample used as source B. Clicking the name opens the Source browser that lets you choose another sample. Alternatively, you can click the arrow icons to load the previous or next sample in the list.
Pan range: Shifts the range of panning applied to the particles. The particles will be distributed in the stereo image according to this range. You can adjust the range by clicking the range icon to the left of the slider and dragging up or down. If link is active, both sources use the same settings. Deactivating link gives you individual controls for each source.
Timbre: Changes the timbre (or tone color) of the particles from soft to hard by readjusting the sample mapping. The particles will be triggered at random timbres within this range. At center position, samples of all timbres will be played. Moving the slider to the right focuses the samples on harder sounds, while moving it to the left focuses them on softer sounds. If link is active, both sources use the same settings. Deactivating link gives you individual controls for each source.
Dynamic: Adjusts the dynamic range of the particles by adjusting their volume while still using the same velocity samples (these are set by the Timbre slider). The particles will be triggered at random velocities within this range. Drag left to shrink, or drag right to expand the dynamic range.
Velocity: When this button is switched on, the particles’ timbre also reacts to the incoming MIDI velocities, making the Particles engine dynamically playable.
Envelopes: Let you control the volume contour of individual particles as well as the entire particle cloud using ADSR envelopes, consisting of Attack, Decay, Sustain, and Release stages. By modulating envelope parameters, you can create evolving sounds that respond dynamically to your performance.
Source Envelope A/B: Selecting the A or B envelopes lets you adjust the volume contour of the individual particles generated from source A or B, respectively. By activating link you can apply the same envelope to all particles generated by source A and B. You can adjust the envelope stages by moving the points in the envelope graph.
Key Envelope: Selecting the Key envelope lets you adjust the overall volume contour of the particle cloud. The Release Particles button next to the envelope graph switches the generation of particles during the release stage on or off. You can adjust the envelope stages by moving the points in the envelope graph.
Effects section
The Particles engine provides four freely assignable effects that let you shape the generated particles independently of the main piano sound. The effects are processed in a chain from top to bottom. Different effect presets and macro controls make it easy to transform the particle cloud, from subtle spatial textures to more experimental sounds.
Tip
You can modulate the macro control for each effect, and assign the controls In the Effects settings panel to the macro. (similar to the fx engine in Vocal Colors.)
You can set find the four effects in the Effects section of the Particles page:
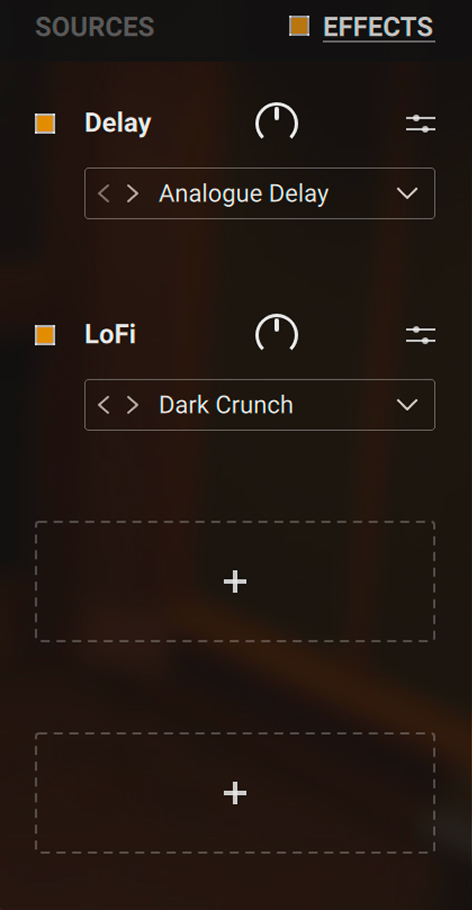 |
Effects On/Off: Switches all four effects on or off at the same time.
Move effect: Hovering an effect reveals a dotted handle that you can click and drag to move the effect to another position in the effects chain.
Empty slot (+ icon): Opens the Effects browser that lets you choose an effect.
Each of the effects provides the following controls:
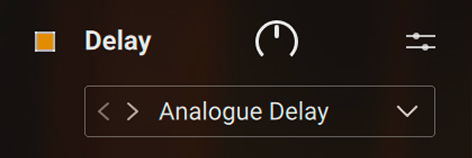 |
Effect On/Off switch: Switches the individual effect on or off.
Effect Macro: Adjusts effect parameters as assigned in the Effect settings. The macros are assigned to key effect parameters by default, letting you adjust the intensity and character of the effect using one control.
Effect Settings: Opens the Effect settings that let you edit the selected effect in detail. The available controls are specific to each effect. Hovering controls in the Effect settings reveals arrow icons that let you create a macro assignment for this control. Click and drag the arrows up or down to define the range of macro control applied to this parameter.
Effect Preset selector: Clicking the name opens the Effects browser that lets you choose another effect. Alternatively, you can click the arrow icons to load the previous or next effect preset in the list.
Note
The Effects section on the Particles page affects only the particles. Effects for the main piano sound are available on the Effect and Space pages. You can find more information in Effect page and Space page for more information.